Showing posts with label Crafty Stuff. Show all posts

Tuesday, November 10

Boy's Room Makeover

My boy's room is FINALLY *officially* finished! It's really been done for awhile (before we moved in I was working on it) but I had to save my pennies for the perfect light fixture to complete the space. (Which came from Lowes btw :)


Here are the BEFORE pictures:


Sort of typical 90's decor. Don't you love how I'm too lazy to get my kid out of the picture? 😜


...And there he is again. Must have been super satisfied playing with that blanket, and hey- why mess up a good thing, right?


Okay, so here is the BIG reveal!! Benjamin told me he wanted an "outer space" room. He is super into Star Wars right now (um, who isn't?) but this momma does not do "themey", and I wanted something that would also appeal to the boys for quite awhile as they get older. I am SO happy with the results!

AFTER pictures:


So I added a casing trim about 8" down from the ceiling which helped make that starry sky seem bigger and heightened our 8' ceilings. 

Choosing the right colors was key in not making the room too dark. I ended up with Behr's Pixel White on the walls (really more gray) and Cosmic Blue on the ceiling.


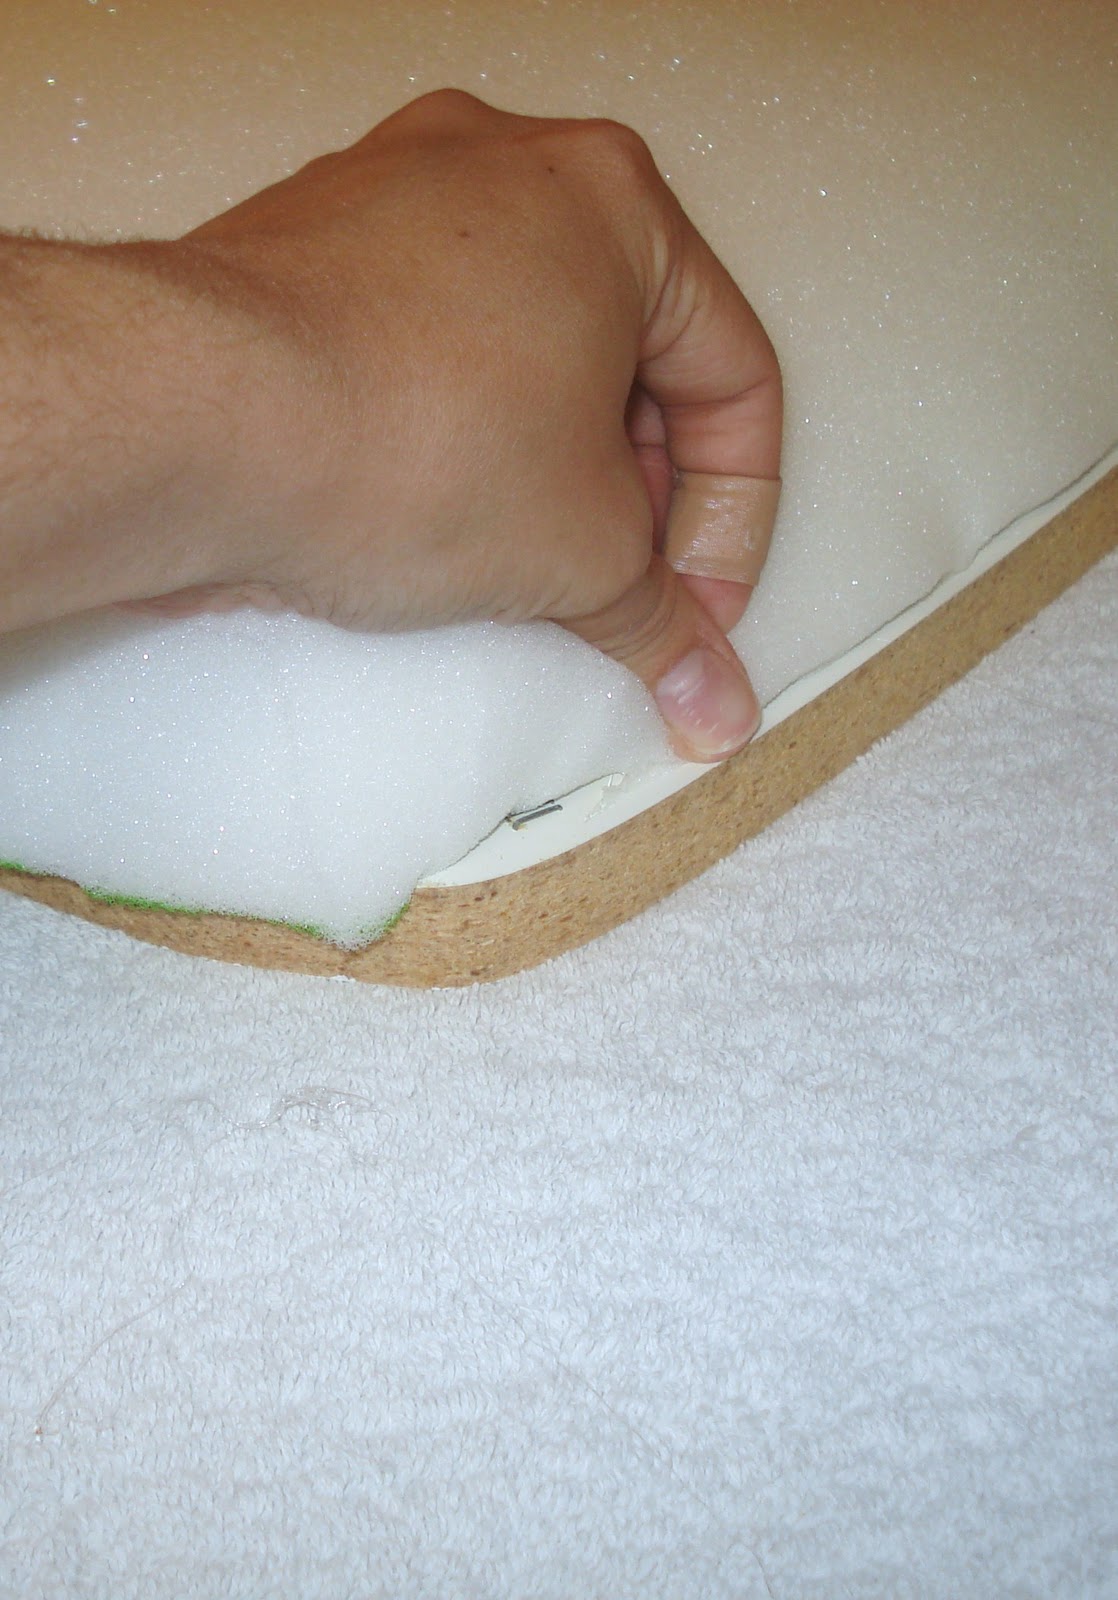
The bedding is from Target and I made the star pillows (copying something I saw on Etsy.) The exposed seams fitting right in with the style of the room made that a super easy and cheap project!


There's my Pinterest rain gutter bookshelves and DIY roman shades over mini blinds projects :)

I'm in love with this little rocking hair I bought on Craigslist and that is Nick's old toy chest in the window on left. It houses all the dress up stuff :) (My kids are costume fanatics!)


Another view...


I just had to use this scripture in the room- so perfect! (Frame: IKEA)


For a pop of color on the adjacent wall, I spray painted an old mirror I already had a Marigold yellow color. (Lamp: Ross)


Aaand... Yay for toy storage!
(Large gray tubs and outer space rug: Target, small blue tubs: Dollar Tree)


Well that about about wraps it up! My boys think their room is AWESOME, it has all the functions I was hoping, and I smile when I walk into it, so I think: mission accomplished! :)


Tuesday, September 17

Chalkboard front Fridge


I've wanted to do this ever since my first episode of "Good Luck Charlie".
Finally got around to it and I LOVE LOVE LOVE it!


I googled magnetic chalkboard panels that fit a fridge and soon realized they don't seem to make them for a "top, bottom" fridge like mine... 

Which turned out to be a huge blessing because they are kinda pricey! After not finding any to fit my fridge, (and quickly deciding I did not want something as permanent as paint...) I then discovered.....

wait for it....

Chalkboard Contact Paper!!!!!!!!!!!!!!!!

Yes, it deserves that many exclamation points.

This stuff is incredible. It is affordable, it is re-positionable, and the possibilities are absolutely endless with this stuff!

I bought mine at Hobby Lobby (btw- I'd somehow managed to never walk down the particular aisle where the chalkboard contact paper resides, and let me tell you... there is some really cool stuff there! The entire aisle is nothing but chalkboard, white board and cork board stuff. Like, stuff you've never dreamed of before... I wanted it all and ALMOST purchased lots of items I had no plans for whatsoever- BUT, I digress...)


(I had a little leftover after my fridge so I stuck it on my dishwasher. Now no one has to ask... :)


I used 2 rolls for my fridge (about $7 each- but, I, of course, bought them at 50% off ;)
The rolls are like 2'x6' and we didn't really want a pieced line down the center length of the fridge... so we decided to go horizontal working our way down from the top. I did have to piece at the bottom with what was left on each roll, but it looks totally fine. Actually, you can hardly tell the paper is even on the front of my fridge. The black just blends right on in together.

(I must give a shout out to my awesome contact-paper-installer-of-a-husband! He was so much better than me at getting the bubbles out! But don't be scared- it really is very forgiving! The whole "re-positionable" thing means you don't have to freak out if you mess up!) 

Okay. So here are some side notes:

I bought this cute eraser on the very same aisle as the paper, and was pleasantly surprised to find out it was magnetic! But, I have to be honest- I never use it. Baby wipes (which I already have in my kitchen anyway) are SOOO much better. They just catch all the dust.


The whole experience is really a lot less messy than I expected. Grant it, I do NOT leave a bucket of chalk on the floor for my kids to draw pictures as they come and go. I let them draw (usually once a day) then wipe their hands (and the floor) and put the chalk away- which is in a cute little box on my kitchen window sill. :)

I am using regular chalk right now but am super curious about this so-called "dustless" chalk they sell. Also, chalk markers.... which are a little expensive. But maybe I'll splurge and check them out.

I wouldn't recommend this on a carpeted area. But other than that, you could use this paper just about anywhere. I mean, the whole chalkboard paint thing has been all the rave for quite awhile now... but, it's so much more permanent, you know? And so much more work.... so, this stuff is my new fav! :)


Tuesday, June 4

Forward Facing Bookshelves


I've been wanting to do bookshelves like these for a couple of years now... mostly for the storage space/organization... but also because it encourages kids to read more when they can see the fronts of the books. 

I saw some different ideas on Pinterest, and at first, I wasn't sure which kind I should attempt. I almost did the rain gutter version. (Click HERE to check out that project.) The gutter ones are very pretty, but since they wouldn't cut them in store for us we were gonna have to borrow a truck to carry it home.... and we were impatient :D 

We went to IKEA to buy the Spice Racks... but lo, and behold- they were on back order until August. Yeah... apparently there are lots of people like me using THIS idea for them.

So... we decided to just build them with 1x4's and L-brackets.


Finished product:

We ended up deciding the raw wood look was better for Benjamin's room anyhow, because they match his toy shelves.

These shelves are 2' wide. 
We bought 2- 8' boards and cut them in 4 equal pieces. 
We used 4 L-brackets for each shelf- 
2 for connecting the boards, 2 for attaching them to the wall. 
(If you want more support you could add 2 more in the center. 
We were fine just attaching each side since our shelves are fairly small.)


First we had to find our studs, and (working around the light switch,) 
figure out where we wanted the shelves. 
We found that spacing them 14" is plenty 
for even our tallest books. 
(We measured from the bottom of one shelf to the bottom of the next.)

We drew dots at the measured increments and then drew lines across the wall using a level so we could match our boards up. (We drew larger dots where the line intersected with the stud so we'd know where to screw in our brackets.)


I considered using the top shelf for puzzles (so they couldn't reach them all at once :) But, we had so many books we needed all the shelves for them. I plan to rotate them each week so the kids can reach different ones. All of our tiny little board books/baby books are in shallow baskets under Ben's bed. 

Total project cost was about $22. 
The wood was less than $5. The bulk of the cost is L-brackets.
I estimated the rain gutter version would have cost us about $36. (Still not bad...) and the IKEA spice racks would have been around $26 if we had used 6. (Those are 1 1/2 feet wide.)

I need to add that I looked and looked for some type of shelf to buy to make these with. As far I tell, Walmart, Target and quite a few other places around me have absolutely NOTHING like this. So I finally broke down and tackled a DIY... but it was very worth it and didn't take long at all. :)


Thanks for looking!


Saturday, March 3

How to make your cricut mat sticky again!!

I have a Cricut that I share with my mom. I haven't used it in awhile. Wanna know why? Because the mat lost it's stickiness and I didn't want to shell out the 12 bucks.


Yep... I'm just that cheap. :D

Anyhow, I needed to use it again recently... and it dawned on me I should google and see if I could just make the old one sticky again.
I CAN!

First Tip: Wash your mat with dish liquid, water and a soft cloth. Most of your tacky surface is probably still there- it's just covered up with paper, dust & other crafty stuff.


Second Tip: Once the tacky really is gone, go out a buy a Zig 2 way glue pen (chisel tip).
(you can even use a coupon to buy it... unlike cricut accessories!)


Coat your entire mat with this pen, working your way from top to bottom in straight lines.
Allow mat to dry 15-20 minutes.
You may need to "set" your mat by pressing your hands all over it before it's first use.
Then, you're good to go!


Side Note:
Some people use Aleen's Tack it Over and Over glue (mixed half and half with water... apply with a sponge stick), or a spray adhesive. But, most people think the Zig pen is much better- even stickier than when the mat is brand new, actually!


oh yeah... I just found out about a software program called scal (sure cuts alot.) It allows you to hook up your cricut to your computer, use all your true type fonts and dingbats, and create your own customized look! It's about $75.

Be sure to get version 1 or 2. They are compatible with Cricut Personal, Cricut Expression, Cricut Create & Cricut Cake.


Monday, February 6

More Activities for Toddlers


BRILLIANT idea I saw on Pinterest!!!


Simply squirt paint into large Ziploc bags (and seal them.)
Put a white piece of paper underneath, then use painters tape to put it on the table.
This mom used 2 different primary colors in each bag to teach an older child about color mixing.

This is the perfect mess-free activity to keep a kid interested for a couple hours on a rainy afternoon.
Leave it taped to the table for as long as you want... Just stick it in a drawer somewhere if you are cleaning up for company- then take it out again later :)

Simple. Cheap. Mess Free.
My kind of activity!

Here's a link to a huge list of other cool toddler activities I ran across:


Have Fun!

Thursday, December 29

Mawmaw's Dining Room Makeover


Well, I promised Mawmaw that I wouldn't post the before pictures. :)
It was basically a shell of a room filled with boxes. No light fixture, no draperies, no table and chairs.
We had to demo some corner shelving, then start from scratch.


So here's the finished product!!!!


We painted EVERYTHING, I installed a bronze chandelier and ceiling medallion, re-upholstered the chairs to this dining set she found at a garage sale...

(Side Note: Don't be scared to mix and match dining chairs! That is very in style right now... If it scares you a little, try what we did and just use different chairs on the ends- sticking to a similar finish. If ya wanna go a little fancier, nice arm chairs- even small wing back chairs are great on the ends! Just make sure the seats are close to the same height as the other chairs- proportionate to the table. :)


I found this rug in the clearance bin at Home Depot (SCORE! Large rugs can get SO pricey! Tip: Neutral rugs really warm up a dining space. Just make sure the rug is large enough for you to pull your dining chairs all the way out.


I added casing above the window to give it a finished look and eliminate the need for a valance. Mawmaw's biggest complaint about this room was the afternoon sun streaming through when they were trying to rest, so the draperies were made with black out lining.


The 3 ring mirror, traditionally called the "wedding ring" style, had an outdated gold finish. Rather than spray painting the entire thing, I sponged it lightly with a silver color to create a 2 tone affect.


Giving a nod to the "wedding ring" mirror, we placed family wedding photos of their children and grandchildren on the opposite wall.


In the center of these photos: the couple who started it all; cutting the cake at their 50th wedding anniversary celebration.


Wednesday, December 21

How To Re-cover Dining Room Chairs


My grandmother bought a dining table with these chairs at a garage sale:


If you're thinking they don't look that bad, you should have tried sitting on them :)
The foam was deteriorating, making for a rather uncomfortable seat.
Also, the fabric looked kinda gross up close.


Remove the old fabric (however many layers you find, :) and old foam with needle nose pliers.


Purchase foam (I bought 2") at your fabric store.
Simply set seat base over foam and trace with a marker, then cut to size.


Glue foam to base. If you want a rounded edge, just glue around edges and sort of fold it over as shown in the picture above.


Next, cut squares of fabric leaving plenty of inches for stapling. My fabric was a tiny stripe, so to ensure I got it straight, I nipped the center of each side with my scissors. It helps you line it up to the center.


Next: Start stapling!
(Pereferably with an ELECTRIC staple gun! I used a manual, and it was a PAIN!!)
Pull as tightly as you can, starting from the center and working your way out. I stapled a few times in the center of all 4 sides then finished each side. It helped my fabric not to move around too much. You can play with the corners. There isn't really a wrong way, just fold and pleat till you like it, then try to make sure all corners are as identical as possible.


When finished, screw onto the chair and walah!


There's the finished product!
I just re-did this entire dining room for my grandmother, and I'll be showing y'all the pictures soon! It was a lot of HARD WORK, and I'm SO excited it's almost ready to show off! 

Thursday, October 20

A Living Room Update


A couple of months ago, my mother asked if I would "take the reigns" on her living room. She couldn't seem to decide on a paint color, or pin point what wasn't working for her in this room. All she knew was, it WASN'T working!

Here were her complaints:

#1 It was TOO DARK! My mom loves dark colors, but admitted that layers and layers of them had turned her living room into a cave!

#2 It didn't function. The only time this room was EVER used, was when my parents had a party or gathering. Whenever us kids came over to chit chat with my parents or watch a ball game, we would all pile into their master bedroom, sitting on the floor & edge of the bed (since there were only 2 chairs in the room.) The considerably large living room served only as a "passage way" between their bedroom and the kitchen. For some reason, no one wanted to sit in it.

My task: To take this dark, foreboding room and make it fresh, modern, & functional- without losing the western style my parents love.


Here's the BEFORE


Here's the AFTER:

When you have dark trim and doors in your house, going with lighter walls is a must. Contrast is important, and Kilim Beige on the walls really makes the beautiful stone fireplace stand out as the focal point of the entire room.


Switching her dark candles to white ones creates a fresh, clean look. In keeping with the earthy, organic vibe of the room; we added some lightly colored rattan balls in clear apothecary jars.


The brown suede throw pillows got re-covered with beautiful fabrics and even some burlap for added texture, and a pop of color!


By simply re-arranging the furniture my mom already had (and pulling some pieces from other rooms,) we created 3 different seating areas within the room, that beckon you to come and sit.


Before, it was easy to drown in a sea of dark brown in this room. By placing a light colored rug between the dark wood furniture and the dark wood floor, it breaks up the monotony. :)


The over-the-window dark shelves were replaced by floor length panels, which draw your eye up and make the room appear taller. (Tip: Another aid in making the ceiling look higher is painting it 1 or 2 shades lighter than your wall color.)


Bringing in small elements in a mixture of different finishes like pewter, antique brass, straw & pottery helped to create warmth in the space, and makes the darker pieces stand out more- instead of all blending together.

The small (almost non-existent) entry way needed some defining. Mom has always been unhappy that you seem to be stepping into the center of the room when you walk in the door. The furniture helps create an illusion of a small square entry area, along with hooks for a coat or hat, and a small round rug.


Family photos in black and white will be going into the frames in the collage. This myriad of mix-matched frames brings in a small eclectic element (which mom asked for,) without losing a rustic feel.

By the way....
This coffee table is FOR SALE along with 2 matching end tables,
and (possibly) a matching console table! :)
It's taking up a little too much space in the room and will be replaced with some fabric upholstered ottomans.

~~~~~~~~~~~~~~~~~~~~~~~~~~~~~~~~~~~~~~~~~~~~~~~~~~~~

TIP
for hanging pictures in a pattern

First, arrange your frames on the floor... playing with them until you achieve the look you want. Then, lay them out on paper- (I used the backside of wrapping paper, which conveniently had a 1'' grid marked out for cutting.)


Simply trace your frames on the paper, drawing an "X" where the nail needs to go.
Hang the paper on your wall. (Here's where you can move it up, down, side to side, and level it...a lot easier than doing that with the real frames!)


When you get it just right, go ahead and hammer a nail thru each "x" mark, so your holes with already be there. Now, hanging the real pictures is not a guessing game!


If you're doing a collage like this one, and you're not sure about spacing, stick to 1 inch. It's a good place to start. :)

Tuesday, August 9

Place Mat Window Treatment


I bought these 6 bamboo placemats at World Market for next to nothing.
First I made 2 wall hangings with them for our previous house.
Then, I used them as placemats (imagine that :)
THEN... I repurposed them yet again to make a window treatment for my back door!


First, I hot glued ea. set of 2 side by side, then glued them on top of each other... (over lapping each one evenly to make it the length I wanted.)


Then, I played around with tiering them up, and added velcro in the correct spots so I could "open" these "blinds" of mine. (tip: I place the velcro in the overlapped sections so they wouldn't show thru when the sun was shining.)


Oh, and I hot glued the top around my magnetic curtain rod.


 Here is what it looks like all the way down.
(See what I mean about the sun shining thru? The overlapped sections have to be measured the same so it doesn't look funny, and it does a good job of hiding the velcro.)


Here is the "half-way open" look:


And, here is all the way open:


It looks SO much better than the black valances I had hanging there,
AND it added a pop of color!